⎈ Secure Network Boundaries using NSP
🙌 Overview
As you have seen in some of the scenarios and in general Kubernetes comes with a flat networking schema. This means if you wanted to create network boundaries, you will need to create something called a Network Policy with the help of CNI. In this scenario, we will be looking at a simple use case of how you can create a Network Policy to restrict traffic and create network security boundaries between Kubernetes resources.
By the end of the scenario, you will understand and learn the following:
- You will learn to work with Network Policies in Kubernetes Cluster
- Understand and work with basic Kubernetes
kubectlcommands and interact with pods & services - Creating and destroying Kubernetes resources and restricting the traffic using NSPs
⚡️ The story
This scenario is to deploy a simple Network Security Policy for Kubernetes resources to create security boundaries.
To get started with this scenario, please ensure you are using a networking solution that supports NetworkPolicy
🎯 Goal
Create a Network Policy to drop the access to the website service to complete this scenario.
🪄 Hints & Spoilers
✨ What is NSP and how to learn?
Let's look at official docs Network Policies. Also there is a detailed explanation of NSP with examples by Ahmet Alp Balkan here🙌
🎉 Solution & Walkthrough
🎲 Method 1
Refer to https://github.com/ahmetb/kubernetes-network-policy-recipes for more recipes and a detailed explanation of Network Security Policies with examples and details.
- Let's run the Nginx container with
app=websitelabels and expose it via port 80
kubectl run --image=nginx website --labels app=website --expose --port 80
- Now, let's run a temporary pod to make a simple HTTP request to the
websiteservice
kubectl run --rm -it --image=alpine temp -- sh
- Let's make a simple HTTP request using
wgetto the website service
wget -qO- http://website
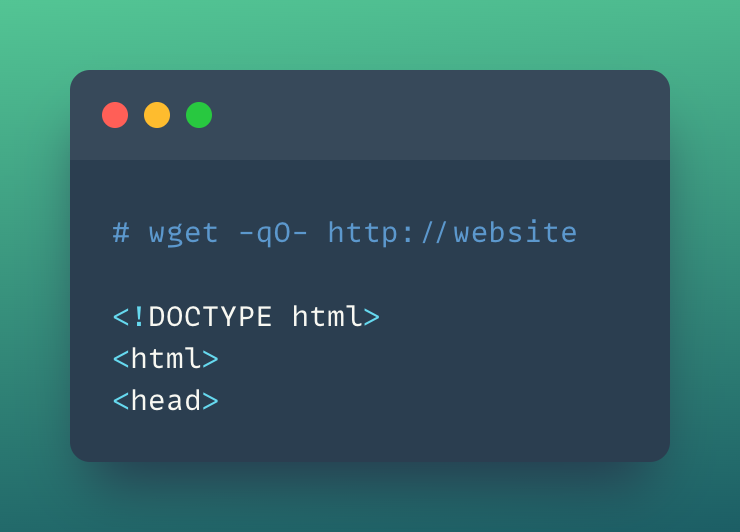
- So far it works perfectly fine. Now let's create a Network Policy and apply it to the Kubernetes cluster to block/deny any requests.
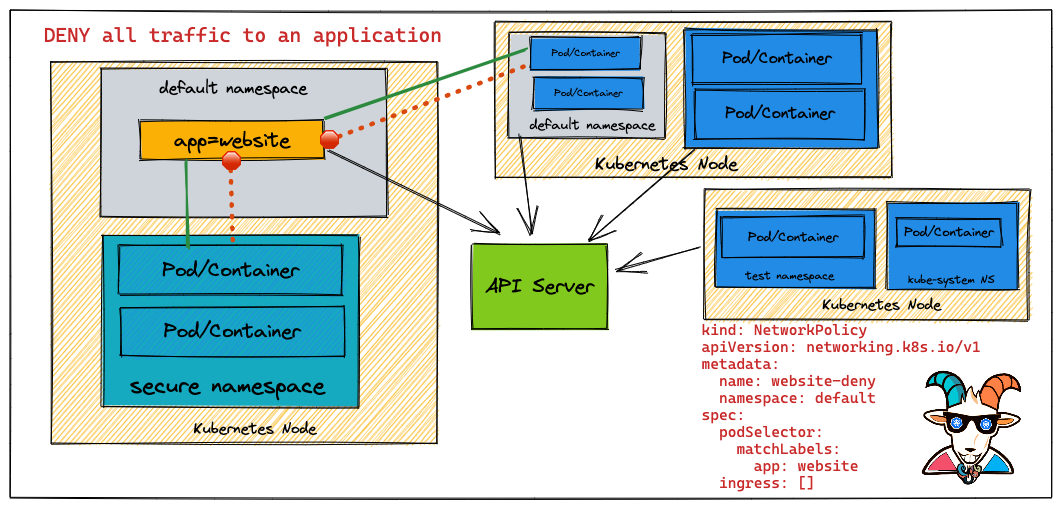
kind: NetworkPolicy
apiVersion: networking.k8s.io/v1
metadata:
  name: website-deny
spec:
  podSelector:
    matchLabels:
      app: website
  ingress: []
- Let's deploy this NSP policy to the cluster by running the following command:
kubectl apply -f website-deny.yaml
- Now, let's retry a HTTP request to our
websiteservice
kubectl run --rm -it --image=alpine temp -- sh
- Let's run the
wgetquery to access the website
wget -qO- --timeout=2 http://website
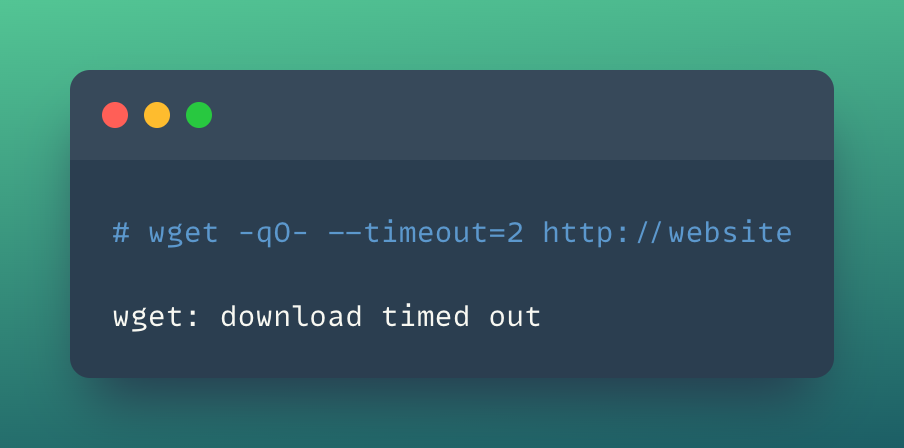
-
As you can see the Network Policy is dropping the traffic and you are not able to access the website now.
-
You can remove all the applied resources and clean up by running the following commands
kubectl delete pod website
kubectl delete service website
kubectl delete networkpolicy website-deny
- Hooray 🥳 , now you have successfully learned how to implement and work with Network Policies in Kubernetes Clusters!